These tips are current as of patch 0.5.7.8. Since Stoneshard is in Early Access, significant changes are expected ahead of full launch. Between now and it’s official release date, Stoneshard is sure to go through balance testing by the Early Access community.
If you see something below that’s drastically different from what you’ve experienced, drop us a comment and we’ll get it updated to the latest patch.
Below, we’ll first talk about getting through the prologue. This section includes the best tips and practices for surviving the enemies leading up to the first boss, as well as what abilities you should bring with you. Then, we’ll talk specifically about how to beat the Ascended Archon.
For more tips, be sure to check out our general help article that shows you how to save, use the map, and farm gold, among other things.
How to Survive the Prologue in Stoneshard
Focusing on Pyromancy makes the Ascended Archon easier to beat.
Finishing the prologue and reaching the first boss is heavily influenced by RNG because of the map’s randomized layout and item drops.
No matter what, don’t keep all the books and loot you find along the way. Unnecessary hoarding fills up your inventory and takes up valuable space for healing items. You don’t keep your loot after the prologue, so you won’t be able to sell the goods to merchants later in the game anyway.
As you make your way through the prologue, don’t take the stairs when you find them in the randomized layout. Instead, fully explore every room and make sure you are at least Level 4 before going up to the secondary portion of the dungeon (the area after taking the stairs following the Archives). You should be Level 6 before tackling the boss in the Corrupted Chapel.
Whether you survive to face the boss entirely depends on the layout of the second portion of the dungeon. The area is swarming with lots of enemies in a small space.
If you can force enemies into a single square hallway and take them on one at a time, you’re golden. If you find yourself in trouble or getting swarmed, stay near the stairs and retreat down. When you go back to the lower floor, don’t move any squares at all. Instead, press “Space” to skip your turn repeatedly until you heal up — then go back up the stairs.
Unless you are funneling enemies into a tunnel to take them on one at a time, don’t forget to stay mobile during combat (before the boss). Moving away makes it difficult for melee enemies to hit you, but it also gives you time to recover energy to cast another spell from a distance.
How to Beat the Ascended Archon in Stoneshard
Preparing for the Battle: Important Weapons and Skills
Avoiding the blood tiles.
The weapons you find change on every playthrough, though there is one important weapon and skill for this fight.
For tackling the Ascended Archon prologue boss, I highly recommend equipping a bow — don’t forget to put arrows in the shield slot and then press “W” to equip a secondary melee weapon in the second weapon space — and putting your skill points into Pyromancy skills when you level up.
Specifically, having these three abilities will make it easier to hit the boss at range:
Fire Barrage — basic ranged fire attack Blaze — reduces cooldown of fire skills for every enemy hit, which lets you cast more spells in succession Melting Ray — hit a large number of enemies at long range
If you reach Level 6 before the boss battle, you’ll have room for two more skills. Scorch and Flame Saturation are two great options, since they increase your fire damage and let you have more energy to cast spells. But any of the other Pyromancy skills are effective.
It’s fine to go this route even if you don’t want your build to be a ranged mage for the rest of the story. You make a new character after the prologue.
Fighting The Ascended Archon
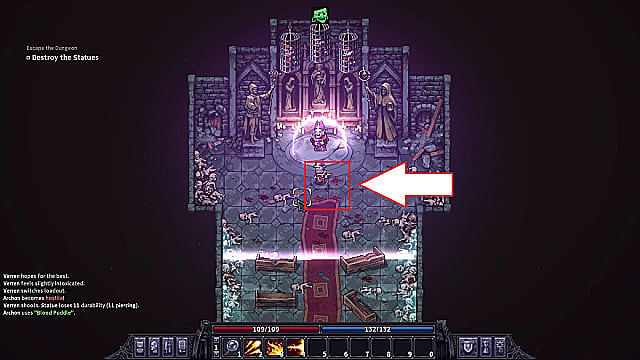
You fight The Ascended Archon in two phases. The first is fighting the blood statues on either side of the toom while the Archon is surrounded by an invulnerable globe. The second is fighting the Archon himself when he transforms into his demonic vampire bat form.
During the first phase, the statues can be taken out in any order, but taking the left statue first means you don’t have to dodge the four blood tiles as often. For this part of the fight, stay where you are at the fight’s start and hit the statue with a bow.
When the statue pours blood on the floor, look at the ground near your feet to see four tiles that will turn to damaging blood on the next turn. Move away from the tile, hit the statue with the bow, and repeat until a zombie is resurrected. Focus on taking out the zombie at range, then return to destroying the left statue, moving out of the way of the blood tiles as necessary.
The right statue doesn’t have any special effects other than resurrecting zombies from the other side of the room. The active zombie will die when the second statue falls, so don’t worry about wasting resources if another one was resurrected while taking out the right statue.
After the second statues falls, get ready for the really difficult part.
Stay back and move diagonally out of the purple line of effect.
The Ascended Archon has three main attacks to look out for:
Straight-line dash Area-of-effect swing Single melee swipe
The boss fight starts with a straight-line dash. It only takes up a single square along the line. This is his first main attack, but there’s a weakness to exploit, which we’ll get to in a bit before covering the other attacks first.
The second attack is a larger area-of-effect swing in a cone in front of the boss. While the damage area is clearly marked by the purple wisps of fire, it’s difficult to get out of the way if you are standing close to the Archon. That’s why you want to focus on ranged Pyromancy attacks and stay as far away as possible. If you end up too close to the Archon due to the first dash attack, diagonal movement is key here.
Finally, the third attack is a single melee swipe one square in front of the Archon. Again, this is a good reason to use ranged weapons like the bow and ranged skills like Pyromancy.
Line up the purple path to hit a wall, statue, or pew (these are more plentiful and easier to hit).
Here’s the real trick to beating the first Stoneshard boss: he can be stunned for two turns after using his charge attack.
To take advantage of this weakness, position the Archon to hit an object somewhere along the purple path of the charge. The path of movement will frequently end one tile before the sidewalls, however, meaning the charge won’t actually cause a stun.
Instead, move south and aim him towards the pews. You get the same stun effect in a much shorter range. Make sure to stay near the edges of the pews so you don’t get stuck in the line of his area effect attack after recovering from the stun.
When the Archon is stunned, fire off your ranged Pyromancy skills, then move away and fire your bow until your energy recharges. Rinse and repeat, aiming him towards the pews for a stun as necessary until the battle ends.
If you mess up and find yourself in front of the Archon, keep moving away rather than engaging in melee.
Hit the Archon while stunned, then move away to avoid the charge and area effect attack
That’s all you need to know about traversing the prologue in Stoneshard and beating the game’s first boss. Need help exploring the wider wilderness after finally escaping the Corrupted Chapel and making your real starter character? Check out the rest of our Stoneshard guides and walkthroughs here.
Stoneshard is the latest game trying to compete with Darkest Dungeon on the early difficulty front. Developed by Inkstain games, the developers behind 12 is Better Than 6, Stoneshard is currently available for PC via Stam for $13.49.


